When using an indicator solution to observe the end-point, the rate of addition of the titrant is determined by visually observing the change in the appearance of the solution in the flask. At the beginning of a titration, titrant may be added rapidly. The indicator may change color in the part of the flask where the titrant is entering the solution (a high concentration of titrant in a small region of the solution), but upon mixing the indicator will rapidly return to its original color.
When the color persists for longer periods of time (1-2 seconds) after mixing, add
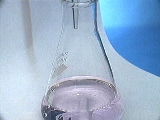
titrant more slowly (a drop or less at a time). When one drop of titrant causes the solution to remain the final color for an extended period of time (at least 30 seconds), stop adding the titrant and record the final volume (See Image 2, below).
Placing the flask on a piece of white paper will often help in the observance of the color change.
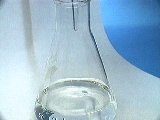
IMAGE 2a.
Flask before endpoint...
IMAGE 2b.
...approximately at endpoint...
(very faint pink tinge.)